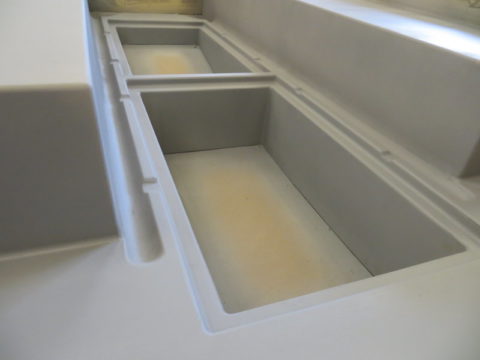
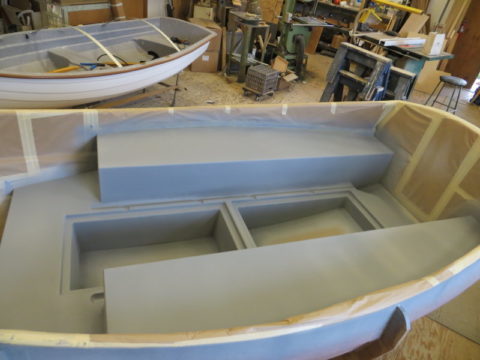
The Crocus blooming around the boatshop turns our thoughts turn to Spring and gets us really concentrating on getting our Scamp in the water. No, I still can’t predict a time but it’s getting closer! Now I can stand next to the Scamp mold and visualize sitting in the cockpit and sailing away…
Several of the home built reports said they wished for larger cockpit drains and larger sump at the stern floor so we incorporated those into our version. We think our 2 “ wide cockpit floor side channels should contain water nicely and the large sump at the stern will be easy to bail or set up a sump pump for those with 12 volt battery aboard.
You’ll note not one, but two compartments in the floor; nope, definitely not two water tanks! The forward compartment is the water tank and the aft one is ‘optional storage’. Why the large openings? Well, lots of Scampers are concerned about being able to have full access to the interior of the water tank so it can be sanitized to prevent transfer of aquatic pests such as Zebra mussels. So we are making a large semi – permanent water tank lid, screwed and gasketed but removable when necessary. A standard 4” diameter screw in hatch will be for water fill ala home built Scamps.
Another tremendous asset to having large hatch openings is being able to use the compartment for ballast other than water. There’s lots of chatter in Scampland about using electric auxiliary propulsion and the ballast tank is the perfect location for batteries. It should be no problem installing 4, 12 volt group 24 batteries inside the water tank space; 4 group 24 batteries = 190 pounds! Perfecto.
The aft floor compartment will be for optional floor storage. It will also have a semi – permanent lid for secure, watertight storage. Quick access will be through an “Armstrong” watertight 12” x 18” toggle type hatch. This storage area is large enough to accommodate 2 group 24 batteries (or just a bunch of stuff you hate to leave behind). Hmmm, 4 batteries in the front tank and two in the aft storage… Even better! And that’ll keep your trolling motor running for days! If you decide you don’t need floor storage then the aft compartment will be omitted from layup and the floor will have a permanent flat lid.
The seat tops and floor look kind of plain now…. Slippery too. But never fear, there’s another intricate step coming. We will create non skid patterns to be incorporated into the seats and floor before making the mold. The pattern will follow the contours leaving smooth areas where you want smooth and non skid where you don’t want to skid.
Seat tops will have waterproof toggle type circular hatches 10” diameter. Also note that Glass Scamps have no sub floor under the seats so the storage inside the seats will be deeper than wood Scamps.
Sanding and primering will take another week, then back to the ‘Glass shop to laminate the interior plug and build the first actual interior. We need that first ‘glass interior to create the dimension and support structure for the bulkhead. Not only will the bulkhead align and support the mast; the aft, lower edge of the bulkhead will reinforce the forward edge of the cockpit floor and tie the entire structure together.
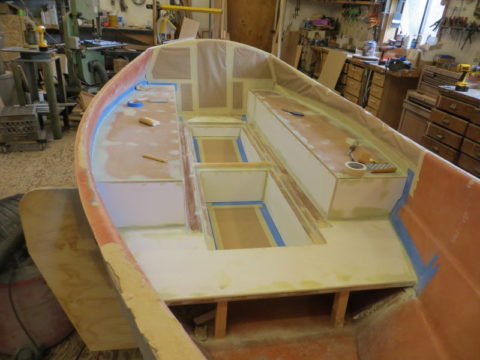
A view of how the deck was constructed, built directly into the hull mold. Note that there is no bulkhead yet!
Another item we’re still exploring is the control for the centerboard pendant. The designed rope pendant with multiple block purchase works O.K., but could be improved. Ideally we’d like a miniature ‘boat trailer’ type winch but so far, those seem to be made from unobtanium. (that means they don’t exist!) We could use some combined brainpower here so feel free to brainstorm and let us know your ideas. The default is to use the rope and block system but working together we can come up with something better, right?
More to come, and if you have questions or comments don’t hesitate to fire away!
Dave and crew at GHBW
